Creating a View Deck That Automatically Cycles Through Images
To create a view deck that cycles through a list of images:
- Right-click the stage in the Outline or Document window, and select Insert > Components > View Deck.
- Add some images to the view deck by dragging the images from the project assets folder or a file explorer.
- Right-click the view deck and select Dataflow.
- In the dataflow window, add a Stopwatch block and set its properties as follows:
- interval: The number of seconds each image is to be displayed.
- loop: TRUE
- modulo: The number of images in the view deck.
- Bind the output of the Stopwatch to the view deck's Selected Index property.
- In the dataflow, set "enabled to true.
If you have specified settings correctly, the images in the viewdeck will start cycling at the specified interval. For your users, the images will start cycling when the page finishes loading.
Create a View Deck with Button Control
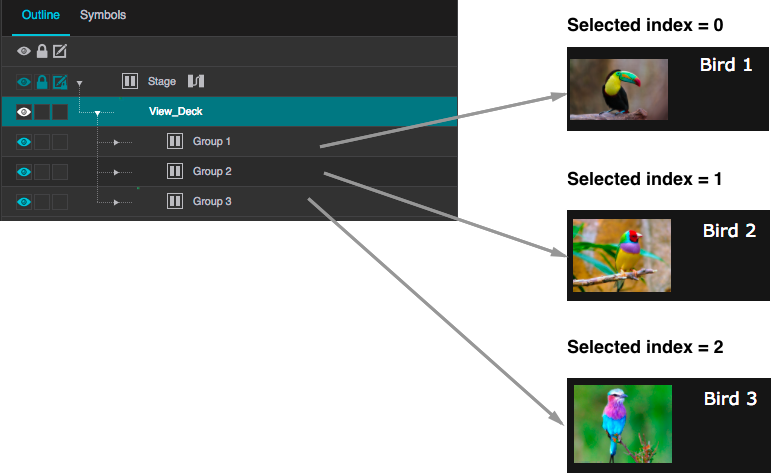
To create a view deck that the user can control using buttons, you create a group thant contains one button for each image and use the group's Selecting Index to control the image that is displayed by the view deck.
First, create a button panel:
- Right-click the stage and select Insert > Components > Group.
- Per your design needs, set the Layout property of the group to "Horizontal" or "Vertical", and the Selection property to "Single Select".
- Insert a text component into the group and set its style properties as desired.
- Duplicate the text component in the group until you have one button for each image you intend to display in the view deck.
- Change the text that appears on each button to indicate which image it displays.
Next, create the view deck and bind its selection index to the button group, as follows:
- Right-click the stage in the Outline or Document window, and select Insert > Components > View Deck.
- Add the desired images to the view deck by dragging the images from the project assets folder or a file explorer.
- In the outline, select the button group. In the Property Inspector, under Selection, hover over Selected Index until a blue dot appears, and double-click the blue dot. A pop-up containing the group's Selected Index property is displayed.
- In the outline, select the view deck, then drag the blue dot from the pop-up to the Selected Index property of the view deck.
To verify that your settings are correct, enter Preview mode. When you click a button in the button group, the view deck displays its corresponding image.
Populate a View Deck with Dynamic Data
To create a view deck that is populated dynamically, define a symbol and use its repeater to populate the view deck. The following steps outline this approach.
- Create a symbol.
- Add symbol parameters for the data that you want to display to the symbol. (To add parameters to a symbol, edit the symbol and choose Modify > Edit Properties.)
- Bind the symbol parameters to the symbol properties that you want to render in the view deck.
- Select the stage or group where you want the view deck to reside and add the view deck.
- Open the view deck's dataflow and define a table containing the data that you want to render in the view deck.
- Select the view deck, and edit its Repeater properties as follows:
- Symbol: Type the name of the symbol that you created in step 1.
- Data: Bind this field from the the table in the view deck dataflow.
- In the Outline, expand the view deck node and select its "renderer" node.
- In the Property Inspector, for each symbol parameter, enter a value or bind a table column from the table in the dataflow. To bind a table column, open the table in dataflow and drag the column header to the field.
The view deck selection index property controls the table row used to populate the symbol that is displayed. To control the selection index, you can create a set of buttons or a dropdown list that is bound to the selection index property.
Return to Atrius Developer Portal Home Page